Human Body Shape
The 3D-printed model of the mesh obtained by measuring the human body is used for various purposes such as the following.
・ Medical education materials
・ A model for explaining the treatment method to the patient
By editing the mesh with PORIGONALmeister before 3D printing, you can create a high quality model in a short time.
Characteristics
- Meshes made from measured data of the human body may contain many error shapes such as self-intersection. If you use the mesh shaping function of POLYGONALmeister, the error shape is automatically corrected with one click and the mesh is made easy to handle by the SW in the subsequent process.
- In addition, there are various editing functions such as a function to correct through holes, dents, protrusions, a function to add thickness, a function to add a pedestal, and a function to sharpen rounded ridges.
Related functions
- Cleaning (Inspect and repair incorrect parts of the mesh.)
- Defeature (Remove through holes, blind holes, dents, protrusions, self-intersections, etc.)
- Smoothing (Make smooth by removing fine irregularities on the surface of the mesh.)
- Simplify (Reduce the number of faces in the mesh.)
- Subdivision (The bulge of a face is estimated from the bending of the surrounding faces, and the face is divided so that it rides on the bulge.)
- Remesh (Reconstruct the mesh so that the faces are close to equilateral triangles.)
- Cut (Cut the mesh with a plane. You can remove one side of the cut or leave both sides.)
- Boolean Operation
- Delete Shells
- Scaling
- Move / Copy
- Drag Move (Shells can be moved along a straight line or on a plane by dragging.)
- Arrange Shells (Arrange shells according to various conditions.)
- Fill Caves (Detect through holes and blind holes of a mesh and fill them.)
- Through Hole (A circular through hole with the specified diameter is made at the clicked position.)
- Remove Protrusion
- Projection Solid (Sweep the open shell to a plane to create a solid shell.)
- Difference Solid (The difference between the mesh and the external file’s mesh is created as solid shells.)
- Loop Cut (Cut the mesh with the closed polyline drawn on the mesh.)
- Reshape CT mesh (reshape the mesh derived from CT measurement.)
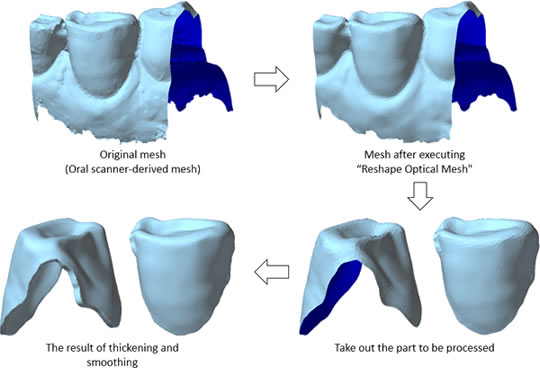
- Reshape Optical mesh (reshape the mesh derived from Optical measurement.)
- Delete Faces
- Delete Boundary Faces (Delete faces near the shell boundary.)
- Fill Holes (Fill the holes on the mesh surface.)
- Extension (Extend the mesh smoothly at the shell boundary.)
- Segmentation (Divide the mesh into multiple color-coded areas based on shape feature.)
- Edit Segment Boundary (Merge segments, or smooth a segment boundary.)
- Thicken (Add thickness to the shell.)
- Offset (Create a mesh that is a fixed distance away from the original mesh.)
- Advanced Self-intersection Removal (Fix complex self-intersections.)
- Sharpen (Makes a rounded ridge area into a sharp edge)
Case study
[ Joint research with Osaka University School of Dentistry: Automatic extraction of feature points by AI technology ]
Feature points (landmark points) are automatically extracted from the skull mesh derived from the measurement.
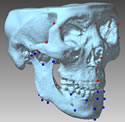
Feature points were automatically extracted
from the upper jaw (red) at 23 locations and
from the lower jaw at 45 locations (blue).
Anyone can do the extraction work of feature points, which takes 30 minutes by an experienced doctor, with just one click.
[ Edit the mesh derived from the measurement by medical X-ray CT / MRI so that it can be modeled with a 3D printer ]
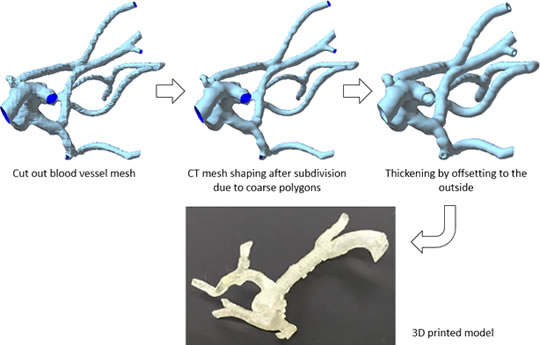
Example1: 3D printing of blood vessel model
The mesh obtained from CT measurement of the human body was shaped and offset by POLYGONALmeister, and then 3D printed.
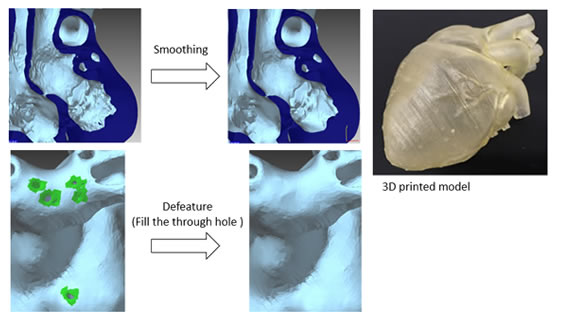
Example2: 3D printing of heart model
The CT data of the heart was corrected with POLYGONALmeister and modeled with OPT's 3D printer.
Problems with the original mesh:
・The data inside the heart is rugged, so remove and smooth the undulations for 3D printing.
・There are through holes that do not exist in the real heart, so it is necessary to fill them.
[ Create a model for analysis and 3D printing from CT measurement data of the inner ear ]
In order to create a model for analysis and 3D printing, mastoid cells were collectively detected and deleted by POLYGONALmeister for the mesh derived from CT measurement of the inner ear.
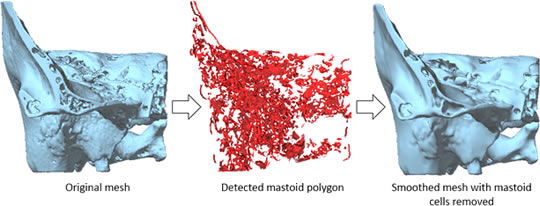
Data provided by Dr. Daisuke Yamanouchi (Otolaryngology-Head and Neck Surgery, Tohoku University School of Medicine)
Oral scanner-derived mesh
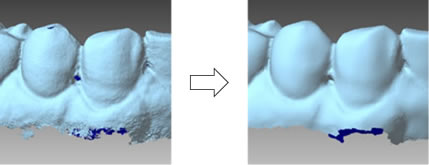
Example1: Reshaping an oral scanner-derived mesh
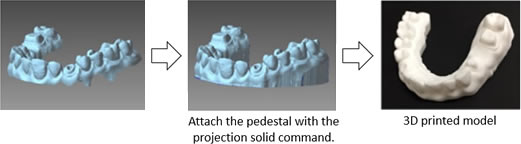
Example2: 3Dprinting
Attach a pedestal and create a mesh for your 3D printer.
Example3: Sharpening
This command sharpens the rounded circular ridge area.
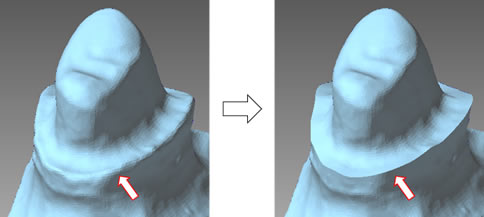
Data provided by: IKASHIKA-GIKEN Ltd.
Example4: Tooth crown (prosthesis) creation
Create a tooth crown (prosthesis) from data collected by an intraoral scanner
Removal of mesh artifacts derived from CT measurement
Remove metal artifacts from mesh, leaving only mandible.
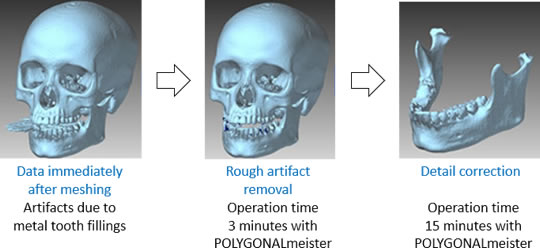
Data provided by Takashi Kamio, Department of Oral and Maxillofacial Surgery, Tokyo Dental College
References: Autotransplantation of Impacted Third Molar Using 3D Printing Technology: A Case Report
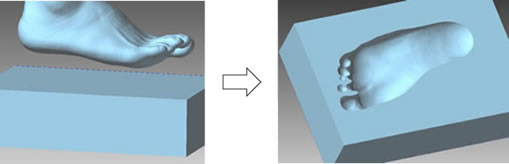
Mold making of human body shape
The mesh created from the laser scan data of the foot is offset by 2 mm and subtracted from the block shape by set calculation.